Virtualization Adapted Adapting Business Processes for Virtual Infrastrcuture (and vice-versa)

2009/08/01

VMware ESX Patch Updates and Release Levels

Filed under: virtualization — Tags: , , , , , , , — iben @ 11:11

VMware makes periodic updates to the ESXi Installable version you can download. This page was created to help track and locate those.

VMware Infrastructure Client

Use these numbers to determine when a system was patched last and to make sure the VMware Infrastructure Client is the right one.

Best Practice:

ESXi: Run the VMware Infrastructure Update tool from a windows management station with the VMware Infrastructure Client every month.

ESX: Use vCenter Update Manager to scan and remediate ESX hosts when new security patches are available.

How to Check the Version Numbers:

  1. Download the VMware Infrastructure Client from the Web User Interface.
    For example: https://ESX-HOST-IP-ADDRESS/client/VMware-viclient.exe
  2. Start the VMware Infrastructure Client
  3. Click the Help Menu
  4. Select “About”
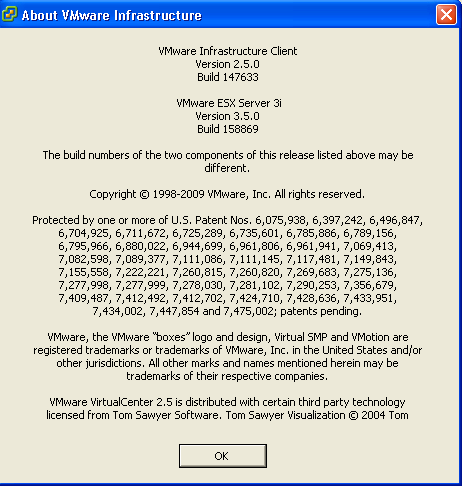
  5. Note the Version and Build for both the Client and Server.
  6. Compare to list below to ensure they are at same release.
  7. If you update the Server you should connect to the Web User Interface and download the latest VMware Infrastructure Client.

Latest Install ISO is VMware ESXi 3.5 Installable Update 4 Build Number: 153875
Released: (2009.03.20)

ESXe350-200907401-O-SG – PATCH Build 176894 (2009.05.28) – VIC 147633 – Tools 176894 <– Latest Patch

ESXe350-200906401-O-BG – PATCH Build 169697 (2009.05.28) – VIC 147633 – Tools 169697

ESXe350-200905401-O-BG – PATCH Build 163429 (2009.05.28) – VIC 147633 – Tools 158874
ESXe350-200904401-O-SG – PATCH Build 158874 (2009.04.29) – VIC 147633 – Tools 158874
ESXe350-200904201-O-SG – PATCH Build 158869 (2009.04.10) – VIC 147633 –
ESXe350-200903201-O-UG – UPDATE Build 153875 (2009.03.30) – VIC 147633 <– Update 4
ESXe350-200903411-O-BG – PATCH Build 153840 (2009.03.20) – VIC 119801
ESXe350-200901401-O-SG – PATCH Build 143129 (2009.01.30) – VIC 143129
ESXe350-200811401-O-SG – PATCH Build 130755 (2009.12.02) – VIC 119801
ESXe350-200810401-O-UG – UPDATE Build 123629 (2008.11.17) – VIC 119801 Update 3

The typical way to apply patches to ESXi hosts is through the VMware Update Manager. For details, see the VMware Update Manager Administration Guide.

ESXi hosts can also be updated by downloading the most recent “O” (offline) patch bundle from http://support.vmware.com/selfsupport/download/ and installing the bundle using VMware Infrastructure Update or by using the vihostupdate command through the Remote Command Line Interface (RCLI). For details, see the ESX Server 3i Configuration Guide and the ESX Server 3i Embedded Setup Guide (Chapter 10, Maintaining ESX Server 3i and the VI Client) or the ESX Server 3i Installable Setup Guide (Chapter 11, Maintaining ESX Server 3i and the VI Client).

Note: ESXi hosts do not reboot automatically when you patch with the offline bundle.

Reference:

http://support.vmware.com/selfsupport/s3portal.portal?_nfpb=true&_windowLabel=SearchPatch&SearchPatch_actionOverride=%2Fportlets%2Fpatchupdate%2FfindPatchByProductVersion&_pageLabel=s3portal_pages_downloadPatch_page&version=3.5&product=ESXi%20(Embedded%20and%20Installable)
2009/04/30

TECHNOTE: VMware Converter Standalone v4

Filed under: virtualization — Tags: , , , , , — iben @ 07:55

VMware Converter Standalone

VMware converter is used for migrating Physical servers to Virtual Machines, Virtual Machines to Virtual Machines.

Directions for conducting a V2V or P2V for Windows Servers

1. Update or Open a tracking ticket to track progress
2. Ensure system is documented and monitored on portal
3. Notify stakeholders via DL – setup DL if needed
4. Login to the Machine to be converted
5. Run defrag and diskcheck if possible
6. Run Microsoft Update
7. Do a reboot test to ensure machine stability
8. Download VMware Converter Standalone version 4 – VMware-converter-4.0.0-146302.exe
9. Download Sysprep tools – unzip but do not run
10. Download NewSID – unzip but do not run
11. Download and run BGinfo – apply
12. Download and run treesize free and clean up unneeded files
13. Install VMware Converter
14. Copy Sysprep files to correct location – c:\documents and settings\all users
15. Launch VMware Converter
16. Import Machine
17. Select the device type; Physical Computer, Virtual Computer from ESX or VMware Workstation.
18. Enter in the remote IP address of the target:
19. Do not select Automatically uninstall the files when the import is successful
20. Select all the drives you wish to migrate to the new Virtual Machine
21. Select ESX or Virtual Center
22. Enter the Virtual Center and user credentials
23. Select the Virtual Machine name
24. Select the ESX host
25. Select the appropriate DataStore
26. Select the appropriate network
27. Check the box install vmware tools
28. If you desire to customize the settings, check the box.
29. Select Finish
30. When completed test new machine and configure.
31. Run newsid if new host names is needed… Keep in mind you cannot have two machines with same name or IP on same network.
32. Run BGinfo and apply again.
33. Verify reboot test and monitoring is functioning.
34. Verify system time.
35. Adjust services as needed.
36. Remove old hardware’s software.
37. Notify stakeholders when old machine is off and new machine is on.

See also: http://communities.vmware.com/thread/129871

2009/03/25

Pano Logic Cube Video Resolution Settings

Filed under: virtualization — Tags: , , , , , , , , , — iben @ 10:50

When logging into a PanoLogic virtual desktop console for the first time…

The default display resolution was 1024×768 standard 4:3 XGA

The HP w1707 LCD monitor has a native resolution of 1680×1050@60Hz 16:10 WSXGA+

Using the pano logic control panel I was only able to set the max resolution to 1440×900@69Hz 16:10 WSXGA

http://www.panologic.com/

List of Supported Reslutions: http://help.panologic.com/2.6/wwhelp/wwhimpl/js/html/wwhelp.htm#href=Introduction/Supported_Monitor_Resolutions.html

2009/03/24

New vSphere product names from VMware

Filed under: virtualization — Tags: , , , , — iben @ 14:22

http://www.vmware.com/support/product_renaming.html

Old Name –> New Name

VMware VirtualCenter –> VMware vCenter Server

VMware Lifecycle Manager –> VMware vCenter Lifecycle Manager

VMware Converter –> VMware vCenter Converter
(for the version integrated into vCenter)

–> VMware vCenter Converter Standalone
(for the separately downloadable version)

VMware Lab Manager –> VMware vCenter Lab Manager

VMware Stage Manager –> VMware vCenter Stage Manager

VMware Update Manager –> VMware vCenter Update Manager

VMware Site Recovery Manager –> VMware vCenter Site Recovery Manager

VirtualCenter Foundation –> vCenter Server Foundation

VMFS –> VMware vStorage VMFS

VMware Virtual Desktop Infrastructure –> VMware View

Virtual Desktop Manager (VDM) –> VMware View Manager

VMware Administrator Interface –> VMware View Administrator

VDM Agent –> VMware View Manager Agent

VDM Web Access –> VMware View Portal

VDM Client for Windows –> VMware View Client for Windows

VDM Client for Linux –> VMware View Client for Linux

2009/03/09

Overhead Memory Table on ESX Virtual Machines

Filed under: virtualization — Tags: , , , , — iben @ 13:46

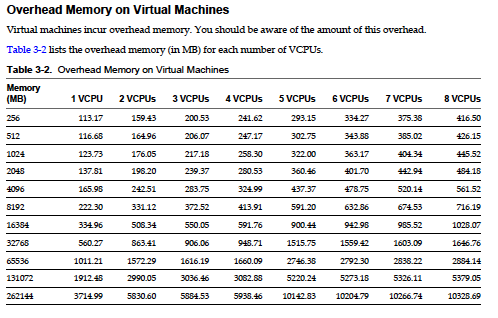
Refer to page 30 of http://www.vmware.com/pdf/vsphere4/r40/vsp_40_resource_mgmt.pdf or page 136 of http://www.vmware.com/pdf/vi3_35/esx_3/r35/vi3_35_25_resource_mgmt.pdf

Memory overhead usage chart

Memory overhead usage chart

Some examples:

With 1 vcpu and 256MB of RAM; the VM kernel requires 87MB for 32 bit VM’s and 108MB for 64 bit VM’s.

With 8GM of RAM and 1 vCPU you’ll need 188MB and 209MB for 32 and 64 bit.

With 4 vCPU’s and 8GB of RAM you’re looking at ~360MB for a 32 bit VM and 431MB for a 64 bit VM.

Note: memory overhead for 32-bit VMs generally increased between 3.0.1 and 3.5 while 64-bit overhead generally decreased.

ESX 3.5 Overhead

ESX
3.5 Update 2
Virtual CPUs Virtual Memory (MB) Overhead for 32-bit VM
(MB)
% Overhead for 32-bit VM Overhead for 64-bit VM
(MB)
% Overhead for 64-bit VM
1 256 87.56 34.20% 107.54 42.01%
1 512 90.82 17.74% 110.81 21.64%
1 1,024 97.35 9.51% 117.35 11.46%
1 2,048 110.40 5.39% 130.42 6.37%
1 4,096 136.50 3.33% 156.57 3.82%
1 8,192 188.69 2.30% 208.85 2.55%
1 16,384 293.07 1.79% 313.42 1.91%
1 32,768 501.84 1.53% 522.56 1.59%
1 65,536 919.37 1.40% 940.84 1.44%
2 256 108.73 42.47% 146.41 57.19%
2 512 114.49 22.36% 152.20 29.73%
2 1,024 126.04 12.31% 163.79 16.00%
2 2,048 149.11 7.28% 186.96 9.13%
2 4,096 195.27 4.77% 233.30 5.70%
2 8,192 287.57 3.51% 325.98 3.98%
2 16,384 472.18 2.88% 511.34 3.12%
2 32,768 841.40 2.57% 882.06 2.69%
2 65,536 1579.84 2.41% 1623.50 2.48%
4 256 146.75 57.32% 219.82 85.87%
4 512 153.52 29.98% 226.64 44.27%
4 1,024 167.09 16.32% 240.30 23.47%
4 2,048 194.20 9.48% 267.61 13.07%
4 4,096 248.45 6.07% 322.22 7.87%
4 8,192 356.91 4.36% 431.44 5.27%
4 16,384 573.85 3.50% 649.88 3.97%
4 32,768 1007.73 3.08% 1086.75 3.32%
4 65,536 1875.48 2.86% 1960.52 2.99%
Averages 408.30 11.51% 453.30 15.29%

ESX 3.0 Overhead

vcpu vRAM 32 bit overhead 64 bit overhead
1 256 79 174
1 512 79 176
1 1024 84 180
1 2048 91 188
1 4096 107 204
1 8192 139 236
1 16384 203 300
2 256 97 288
2 512 101 292
2 1024 101 300
2 2048 125 316
2 4096 157 349
2 8192 221 413
2 16384 349 541
4 256 129 511
4 512 133 515
4 1024 141 523
4 2048 157 540
4 4096 189 572
4 8192 222 605
4 16384 350 734

TCP Wrappers for ESX Classic

Filed under: virtualization — Tags: , , , , , , , — iben @ 08:50

Here’s an example hosts.allow:
#begin
sshd:management.host.com:allow
sshd:ALL:deny
xinetd:management-host-ip-or-fqdn-hostname:allow
xinetx:ALL:deny
httpd:management-host-ip-or-fqdn-hostname:allow
httpd:ALL:deny
#eof
But even this may be too simple.

Reference:
http://www.dell.com/downloads/global/…/tnc/dell_vmware_certified_deploy.pdf

http://communities.vmware.com/thread/182964?tstart=0
What this will do is allow all hosts to ssh into the system while only allowing VI client connections from the virtualcenter server. This means you pretty much have to go through virtualcenter to manage the system.

Powered by WordPress